Come risolvere il problema di Internet lento?
2. Per gli utenti VIP: ti preghiamo di aprire iTop VPN > Tutti i server > ** Server più veloci > Connetti e riprova.
Se le soluzioni sopraindicate non dovessero funzionare, ti preghiamo di aprire iTop VPN > cliccare l’icona Opzioni in alto a destra > cliccare Feedback per inviarci il tuo feedback così da aiutarti a risolvere il problema.
Come risolvere i problemi “impossibile connettere a iTop VPN”, “connessione VPN instabile”, “nessuna connessione Internet con la VPN connessa”?
Se si verifica questa situazione, ti preghiamo di disinstallare l’antivirus e provare di nuovo a connetterti a iTop VPN.
Se le soluzioni sopraindicate non dovessero funzionare, ti preghiamo di aprire iTop VPN > cliccare l’icona Opzioni in alto a destra > cliccare Feedback per inviarci il tuo feedback così da aiutarti a risolvere il problema.
Perché alcuni programmi non sono compatibili con iTop VPN?
Non ho ancora ricevuto il prodotto acquistato / la password / la licenza / il codice di attivazione, cosa devo fare?
2. Se hai già registrato su iTop VPN l’indirizzo email con cui hai effettuato l’ordine, il tuo account iTop VPN diventerà automaticamente VIP quando il tuo ordine verrà elaborato con successo.
3. Se non hai ancora registrato l’indirizzo email con cui hai effettuato l’ordine, ti preghiamo di cercare nella casella di Posta Indesiderata o Spam un email inviata da noreply@itopvpn.com con all’interno il tuo indirizzo email per l’account VIP e una password temporanea. Quindi segui i passaggi su https://it.itopvpn.com/how-to-activate per attivare il tuo account VIP.
4. Se non sei riuscito a trovare la tua password, puoi reimpostarla attraverso i seguenti metodi:
• Apri https://it.itopvpn.com/reset-password, inserisci l’indirizzo email che hai utilizzato per effettuare l’ordine e clicca il pulsante Invia per reimpostare la tua password.
• O apri iTop VPN, clicca il pulsante Opzioni in alto a destra > Accedi > Clicca il link “Password dimenticata?” per reimpostare la tua password.
Se le soluzioni sopraindicate non dovessero funzionare, ti preghiamo di aprire iTop VPN > cliccare l’icona Opzioni in alto a destra > cliccare Feedback per inviarci il tuo feedback così da aiutarti a risolvere il problema.
Cosa devo fare se appare indirizzo email / password incorretta / invalida quando mi registro?
• Apri https://it.itopvpn.com/reset-password, inserisci il tuo indirizzo email, clicca il pulsante Invia per reimpostare la tua password.
• O apri iTop VPN, clicca il pulsante Opzioni in alto a destra > Accedi > Clicca il link “Password dimenticata?” per reimpostare la tua password.
Perché sto ancora usando la versione gratuita / limitata se ho già acquistato iTop VPN VIP?
Ti preghiamo di cliccare qui per vedere tutti i passaggi per attivare l’account VIP di iTop VPN.
Se le soluzioni sopraindicate non dovessero funzionare, ti preghiamo di aprire iTop VPN > cliccare l’icona Opzioni in alto a destra > cliccare Feedback per inviarci il tuo feedback così da aiutarti a risolvere il problema.
Cos'è iTop VPN?
Quali sono le funzionalità principali di iTop VPN?
• Posizione Intelligente ti permette di selezionare in maniera automatica il server più stabile per te. Puoi anche selezionare manualmente lo Stato al quale vuoi connetterti.
• Protocolli di Rete ti offre diversi protocolli per soddisfare ogni tua esigenza sul web.
• Larghezza Illimitata di Banda è una funzionalità invisibile che ti permette di usufruire dei tuoi contenuti preferiti senza doverti preoccupare di raggiungere il limite di banda.
Quali sono le specifiche minime per iTop VPN su Windows?
• Windows 11/10/8.1/8/7
• 300 MB di spazio libero su disco
• Risoluzione minima dello schermo di 1024*768
• Per alcuni dispositivi con Windows 7, ti sarà richiesto di installare l'aggiornamento Windows (kb4474419) per assicurarti che iTop VPN funzioni correttamente sul tuo PC.
iTop VPN supporta più dispositivi?
Come disattivare l’avvio automatico di iTop VPN all'accensione di Windows?
Quali sono i protocolli network e come scegliere tra quelli preimpostati?
Qual è il miglior server per me?
Come disinstallare iTop VPN?
Apri Start > Premi Impostazioni > Premi App nel menu Impostazioni > Seleziona Programmi e funzionalità o App e Funzionalità dal pannello di sinistra > Cerca iTop VPN and premi su Disinstalla > Segui le indicazioni sullo schermo.
Windows 8.1 & 8:
Apri Start > Premi Pannello di Controllo > Seleziona Programmi e Funzionalità > Cerca iTop VPN e premi su Disinstalla > Premi sul tasto Sì quando indicato per disinstallare il programma > Segui le indicazioni sullo schermo per rimuovere il programma dal tuo computer.
Windows 7:
Premi Start sulla barra in basso e seleziona Pannello di Controllo > Sotto Programmi, premi su Disinstalla un Programma > Seleziona iTop VPN > Premi Disinstalla sopra la lista dei programmi > Segui le indicazioni su schermo per rimuovere il programma dal tuo computer.
Come posso verificare che il mio vero IP sia realmente nascosto da iTop VPN?
La cache del tuo browser potrebbe far sì che compaia lo stesso indirizzo IP che avevi visto prima di connetterti ad iTop VPN. In questo caso, elimina la cache del tuo browser ed effettua nuovamente la ricerca. In alternativa, usa un altro browser.
Cos’è iTop Private Browser?
iTop Private Browser è un browser web basato su Chromium facile da usare ma ricco di funzionalità con una VPN integrata e alcuni strumenti di sicurezza. Grazie a queste funzionalità e strumenti, iTop Private Browser ti offre un’esperienza di navigazione veloce, privata e senza distrazioni.
In che modo iTop Private Browser protegge la mia sicurezza e la mia privacy?
VPN integrata:
La crittografia di grado militare nasconde il tuo indirizzo IP e crittografa il tuo traffico online per una navigazione privata e sicura.
Strumenti di sicurezza:
Anti-Tracciamento: protegge la tua privacy impedendo a siti web dannosi di tracciare le tue attività online.
Blocco Annunci: blocca tutti i tipi di annunci fastidiosi che compaiono mentre navighi sul web per offrirti un’esperienza di navigazione senza distrazioni.
Anti-Phishing: ti impedisce di accedere a siti web dannosi e ti protegge da perdite della privacy, minacce online e mining di criptovaluta.
Quali sono i requisiti di sistema di iTop Private Browser?
• Windows 11/10/8.1/8/7 (64-bit)
• 500 MB di spazio libero su disco
• Risoluzione schermo 1024*768 e superiore
iTop Private Browser è compatibile con altri browser?
Sì, iTop Private Browser è compatibile con altri browser. Puoi anche importare segnalibri da altri browser o segnalibri di file HTML.
Come importare i segnalibri in iTop Private Browser?
Apri iTop Private Browser > Clicca "Importa i tuoi segnalibri..." sotto la barra degli indirizzi > Seleziona un browser o segnalibri di file HTML > Clicca Importa per iniziare a importare.
Qual’è la differenza tra iTop Private Browser gratis e iTop Private Browser VIP?
iTop Private Browser VIP include tutte le funzioni di iTop Private Browser gratis. Inoltre, iTop Private Browser VIP gode di più server VPN, una velocità Internet maggiore e assistenza tecnica migliore.
iTop Private Browser registrerà le mie informazioni?
No. Abbiamo una rigorosa politica no log, il che significa che non registriamo le tue attività mentre stai utilizzando il nostro Servizio.
Non ho ancora ricevuto il prodotto acquistato / la password / la licenza / il codice di attivazione, cosa devo fare?
1. Non hai bisogno di un codice di attivazione o di una licenza per attivare l’account VIP di iTop Private Browser.
2. Se ti sei già registrato su iTop Private Browser con l’indirizzo email con cui hai effettuato l’ordine, il tuo account iTop Private Browser diventerà automaticamente VIP quando il tuo ordine verrà elaborato con successo.
3. Se non hai ancora registrato l’indirizzo email con cui hai effettuato l’ordine, ti preghiamo di cercare nella casella di Posta Indesiderata o Spam un’email inviata da noreply@itopvpn.com con all’interno il tuo indirizzo email e una password temporanea. Quindi segui i passaggi su https://it.itopvpn.com/how-to-activate per attivare il tuo account VIP.
4. Se non sei riuscito a trovare la tua password, puoi reimpostarla attraverso il seguente metodo:
•Apri https://it.itopvpn.com/reset-password, inserisci l’indirizzo email che hai utilizzato per effettuare l’ordine e clicca il pulsante Invia per reimpostare la tua password.
Come disinstallare iTop Private Browser?
Windows 11 e 10:
Apri Start > Clicca Impostazioni > Clicca App nel menu Impostazioni > Seleziona Programmi e funzionalità o App e funzionalità dal pannello di sinistra > Trova iTop Private Browser e clicca Disinstalla > Segui le istruzioni visualizzate sullo schermo.
Windows 8.1 e 8:
Apri Start > Clicca Pannello di Controllo > Seleziona Programmi e funzionalità > Trova iTop Private Browser e clicca Disinstalla > Clicca sul pulsante Sì quando viene richiesto di disinstallare il programma > Segui le istruzioni visualizzate sullo schermo per rimuovere il programma dal tuo computer.
Windows 7:
Clicca Start nella barra delle applicazioni e seleziona Pannello di Controllo > In Programmi, clicca su Disinstalla un programma > Seleziona iTop Private Browser > Clicca Disinstalla nella parte superiore dell’elenco dei programmi > Segui le istruzioni visualizzate sullo schermo per rimuovere il programma dal tuo computer.
Is there a limitation on recording length?
No, there is no limitation on recording length. However, the recording could be limited by the capacity of free drive space where you save the recorded files to. Also, be aware that recording longer time will create very large files that may reduce system performance while working on them like editing and exporting.
Is there watermark in the recorded video?
You can record with/without watermark as per your needs as follows:
Please click Watermark in the main screen > select Default to record with watermark or select No watermark or select Customize to edit your own watermark.
How to record my PC screen with iTop Screen Recorder?
Please follow the steps as follows to start your record:
1. Open iTop Screen Recorder.
2. Select to record screen/video or audio
3. If you select to record screen/video, please click the drop-down arrow near full screen to select the region or window or full Screen to record.
4. Click the record button REC to start recording.
5. Click the red Done button in Floating Toolbar or press F9 (for video by default) or F8 (for audio by default) to complete recording.
How to record audio from my microphone and speaker into video simultaneously?
Please click the ON/OFF buttons for both microphone and speaker in the main screen to enable the features before your recording.
How to record mouse actions and add mouse click effects in my record?
iTop Screen Recorder supports recording with mouse actions, please click the OFF button for mouse in the main screen to enable mouse actions.
To add mouse click effects to your recording, please click Options > click Settings > click Record in the left panel > tick Add highlight effects (ticked by default) and/or Add click animation per your needs.
How to share my recorded videos to third party platforms such as YouTube, Facebook, Instagram, and Twitch?
You can share the videos to third party platforms as follows: Right click the recorded video in Videos under My creations in the main screen > click Upload > click the platform you want to share to.
Where will the recorded video be saved to?
To find the default saved to directory, please go to Options > Settings > Record. You can also click the folder icon to change the directory.
How to trim my recorded video with iTop Screen Recorder?
Please right click the recorded video in Videos under My creations in the main screen and click Edit. Then you can trim the video as you like.
Can I record two monitors simultaneously?
Yes, you can record two monitors as follows:
Open iTop Screen Recorder > Select Region > drag your mouse to select the two monitors at the same time to record two monitors.
How do I register/refresh my iTop Screen Recorder PRO edition?
Please click here to view the detailed instructions to register/refresh iTop Screen Recorder PRO edition.
How to change language?
Open iTop Screen Recorder > Click Options icon on the top right > click Settings > choose the language you want under General settings.
How to update iTop Screen Recorder?
Pro users can always enjoy the latest version automatically with Automatically update to the latest version ticked in Settings.
Free users can manually update iTop Screen Recorder as follows:
Click Options icon on the top right and select Check for updates to update your program.
How to record webcam into video simultaneously?
Please click the ON/OFF buttons for webcam in the main screen to add webcam overlay into your video.
You can also go to Options > Settings... > Webcam to set the overlay position and size.
How to uninstall iTop Screen Recorder?
Windows 10:
Open Start > Click Settings > Click Apps on the Settings menu > Select Programs & features or Apps & features from the left panel > Find iTop Screen Recorder and click Uninstall > Follow the on-screen prompts
Windows 8.1 & 8:
Open Start > Click Control Panel > Select Programs & features > Find iTop Screen Recorder and click Uninstall > Click the Yes button when prompted to uninstall the program > Follow the on-screen instructions to remove the product from your computer
Windows 7 and Windows Vista:
Click Start on your taskbar and select Control Panel > Under Programs (Windows 7) or Programs and Features (Windows Vista), click on Uninstall a program > Select the product you wish to uninstall > Click Uninstall at the top of the program list > Follow the on-screen instructions to remove the program from your computer.
Windows XP:
Click Start on your taskbar and select Settings > Click on Control Panel > In the Control Panel window, click on Add or Remove Programs > Select the product you wish to uninstall > Click Change/Uninstall > Follow the on-screen instructions to remove the program from your computer.
How to fix the “No webcam detected” issue?
When your webcam isn’t recognized by iTop Screen recorder, you can try the following steps to solve the issue:
Solution for built-in webcam:If you are using a built-in webcam, make sure that the webcam is turned on.
Solution for an external connected webcam:
1) Disconnect and reconnect your webcam, or reconnect it with a different USB port (USB 2.0 or USB 3.0 port) on your PC.
2) Disconnect other unused USB devices if any.
3) Check your antivirus software and make sure it does not block access or permission to use your webcam.
4) Uninstall your webcam driver and scan for hardware changes.
Open Device Manager, right click on your webcam, and then select Properties > Select the Driver tab and select Uninstall > Delete the driver software for this device and select OK > On the Action menu, select Scan for hardware changes. Wait for it to scan and reinstall updated drivers, and restart your PC to see if it works.
5) If your webcam works properly with other apps like MSN, Skype, etc., but only cannot work with iTop Screen recorder, please contact us for assistance.
How to fix the “No Sound" issue from speaker and/or microphone in recorded videos?
Please click here to get detailed solutions.
How to fix the error “The current directory is not accessible”?
Please click here to get detailed solutions.
How to fix the error “Failed to load the recording library.”?
What image formats do you support?
Currently, JPEG, PNG, and BMP are supported.
How to change language?
Open iTop Screenshot> Click Menu icon on the top right > click Settings > choose the language you want under General settings.
How to take a screenshot?
You have 2 methods to take screenshots:
1) Please click Capture button in the main screen of the program to start to capture.
2) You can take screenshot through hotkeys according to your personal settings.
By default:
Start to Capture: Alt+A
Capture full screen: Alt+S
Capture the active window: Alt+W
Capture scrolling window: Alt+d
How to copy a screenshot to the Windows clipboard?
Please click the icon “copy to clipboard” in the floating toolbar when capturing or press Ctrl+C.
How to annotate or highlight my screenshot?
You can annotate or highlight your screenshot by clicking the corresponding icon for Rectangle, Oval, Line Arrow, Paintbrush, and Text in the floating toolbar during capture.
Where will the screenshots be saved to?
To find the default saved to directory, please go to Menu > Settings. You can also click the folder icon to change the directory in Settings or click the drop-down arrow near Save in the floating toolbar to change.
How to share my screenshots to third party platforms such as Facebook, Twitter, Pinterest, and Imgur?
Click the “Share to” icon in the floating toolbar and then select the platforms you want to share.
How to uninstall iTop Screenshot?
Windows 10:
Open Start > Click Settings > Click Apps on the Settings menu > Select Programs & features or Apps & features from the left panel > Find iTop Screenshot and click Uninstall > Follow the on-screen prompts.
Windows 8.1 & 8:
Open Start > Click Control Panel > Select Programs & features > Find iTop Screenshot and click Uninstall > Click the Yes button when prompted to uninstall the program > Follow the on-screen instructions to remove the product from your computer.
Windows 7 and Windows Vista:
Click Start on your taskbar and select Control Panel > Under Programs (Windows 7) or Programs and Features (Windows Vista), click on Uninstall a program > Select the product you wish to uninstall > Click Uninstall at the top of the program list > Follow the on-screen instructions to remove the program from your computer.
Windows XP:
Click Start on your taskbar and select Settings > Click on Control Panel > In the Control Panel window, click on Add or Remove Programs > Select the product you wish to uninstall > Click Change/Uninstall > Follow the on-screen instructions to remove the program from your computer.
What is iTop Data Recovery?
iTop Data Recovery is a light yet powerful data recovery software to help you recover the accidentally lost documents, data files, videos, photos and more from HDD, SSD, USB, Memory Card, etc.
How do I register my iTop Data Recovery PRO edition?
Please click here to view the detailed instructions to register iTop Data Recovery PRO edition.
How to uninstall iTop Data Recovery?
Windows 10:
Open Start > Click Settings > Click Apps on the Settings menu > Select Programs & features or Apps & features from the left panel > Find iTop Data Recovery and click Uninstall > Follow the on-screen prompts
Windows 8.1 & 8:
Open Start > Click Control Panel > Select Programs & features > Find iTop Data Recovery and click Uninstall > Click the Yes button when prompted to uninstall the program > Follow the on-screen instructions to remove the product from your computer
Windows 7:
Click Start on your taskbar and select Control Panel > Under Programs, click on Uninstall a program > Select the product you wish to uninstall > Click Uninstall at the top of the program list > Follow the on-screen instructions to remove the program from your computer.
What file types can iTop Data Recovery Recover?
iTop Data Recovery supports recover hundreds of different file types. You can easily recover any of the below-mentioned categories of file types by using this software:
Photos:
*.jpeg,*.png,*.ico,*.bmp,*.jpg,*.gif,*.dib,*.dif,*.eps,*.iff,*.mpt,*.tif,*.tiff,*.cdr,*.wmf,*.pcd,*.tga,*.svg
Videos:
*.avi,*.mov,*.mpg,*.mp4,*.flv,*.wmv,*.mpg,*.mpeg,*.mpe,*.mpv,*.m1v,*.m4v,*.ifv,*.qt*,rmvb,*.mkv,*.asf,*.rm,*.navi,*.3gp,*.swf
Music:
*.mp3,*.wma,*.ogg,*.wav,*.aac,*.m4a,*.flac,*.aif,*.aiff,*.aifc,*.aifr,*.midi,*.mid,*.rmi,*.mp2,*.ape,*.vqf
Documents:
*.doc,*.xls,*.ppt,*.odt,*.ods,*.pdf,*.docx,*.xlsx,*.pptx,*.odc,*.txt,*.html,*.htm,*.ini,*.text,*.log,*.pas,*.h,*.cpp,*.xml,*.lan
Archives:
*.rar、*.zip、*.7-zip、*.ace、*.arj、*.bz2、*.cab、*.gzip、*.iso、*.jar、*.lzh、*.tar、*.uue、*.xz、*.z、*.7z、*.b64、*.bhx、*.bz、*.gz、*.hqx、*.img、*.lha、*.mim、*.taz、*.tbz、*.tbz2、*.tgz、*.tz、*.uu、*.uue、*.xxe、*.zipx、*.arc, *. paq, *.pea, *.quad, *.balz、*.upx、*.wim、*.deb、*.dmg、*.rpm、*.udf
Other types:
*.TBB,*.eml,*.pst etc.
Can you guarantee that iTop Data Recovery can recover all files?
The simple answer to this question is No. Although iTop Data Recovery is a powerful data recovery software, it can not guarantee 100% recovery rate. Sometimes Windows has overwritten the file's original location, and other times the file is too corrupted to recover. You can check this with iTop Data Recovery at almost any time. Once you verify that you can preview them, then you can upgrade to iTop Data Recovery PRO to recover them.
Why the recovered files cannot be opened?
A file is saved as 2 parts on the storage device: directory info (which is comprised by file name, time stamp and size info, etc.) and data content. If the files with original file names and folder structures cannot be opened, one possible reason is the corrupted directory info.
Can I recover data to the original drive?
Any changes to the drive would alter or damage the storage structure of the lost files. If the recovered files are saved back to the original drive, the original data structures and data content will be corrupted or overwritten, resulting in permanent data loss. As a result, you should prepare another disk to save the files on.
How do I register my Top Data Protector PRO edition?
Please go to here and click the Top Data Protector tab to view the detailed instructions to register Top Data Protector PRO edition.
How to uninstall Top Data Protector?
Windows 11:
Open Start menu > Click All apps > Locate Top Data Protector and right-click on it > Click Uninstall from the context menu > Follow the on-screen prompts to enter your password of Top Data Protector to remove it from your computer.
Windows 10:
Open Start > Click Settings > Click Apps on the Settings menu > Select Programs & features or Apps & features from the left panel > Find Top Data Protector and click Uninstall > Follow the on-screen prompts to enter your password of Top Data Protector to remove the product from your computer.
Windows 8.1 & 8:
Open Start > Click Control Panel > Select Programs & features > Find Top Data Protector and click Uninstall > Click the Yes button when prompted to uninstall the program > Follow the on-screen instructions to enter your password of Top Data Protector to remove the product from your computer.
Windows 7:
Click Start on your taskbar and select Control Panel > Under Programs, click on Uninstall a program > Select the product you wish to uninstall > Click Uninstall at the top of the program list > Follow the on-screen instructions to enter your password of Top Data Protector to remove the program from your computer.
What should I do if I forgot the password of Top Data Protector account?
Please click the Forgot password text link on Top Data Protector screen > enter the email address of Top Data Protector account > click the Reset password button > then an email with a temporary password will be sent to your Top Data Protector account.
Please log in your Top Data Protector with this password > go to Settings > change password to the one you want.
How do I retrieve the files/folders protected by Top Data Protector after I reinstall the system?
Please note that files/folders are not stored in Top Data Protector. Top Data Protector just Hide, Deny Read Access, and Deny Write Access to these files/folders to protect them.
Once you reinstall the whole system, the files/folders protected by Top Data Protector are still in their original directory if they are not originally stored in C:\. If they were stored in C:\ before you protect them with Top Data Protector, they will be wiped after you reinstall the system. Thus cannot be retrieved.
Does Top Data Protector conflict with other security applications or system utilities?
No. Top Data Protector DOES NOT conflict with any existing security application. Top Data Protector can work with your existing system utilities and tools. You have complete freedom to use any utility of your choice along with Top Data Protector.
Can someone disable Top Data Protector by ending its process?
No. If someone uses Task Manager to end the process of Top Data Protector, it only stops the user from accessing the program interface to perform operations, like viewing the protected files, adding new files for protection, and unprotecting/removing files from protection. However, the protection itself remains in effect, because it is performed in the kernel, which is not affected by ending the process.
What is DualSafe Password Manager?
DualSafe Password Manager is a simple, secure, strong, and smart password manager. In addition to managing your password, you can also save your secure notes, payments info, and personal info to DualSafe Password Manager. You can keep all your secrets here.
Is it secure to save my data in DualSafe Password Manager?
Your data security is our top priority. With the zero-knowledge security architecture, DualSafe Password Manager encrypts your data using AES-256 with a unique key that is randomly generated based on your account and password of DualSafe Password Manager. All of this is done locally on your side, thus no one else, including all members in DualSafe Password Manager team, can access your data.
When syncing your data, DualSafe Password Manager re-encrypts your data via HTTPS and then syncs your data seamlessly between your devices.
So your data security is guaranteed during all processes.
How to add my data to DualSafe Password Manager?
You can add your data to DualSafe Password Manager in 2 ways:
1) Run DualSafe Password Manager, click the Add Item button to add your data one by one.
2) Import your data from a CSV file.
When you run DualSafe Password Manager for the first time, it will guide you to add data manually or import data from a CSV file. In later use, you can go to More Tools, find Import and Export to import data from a CSV file.
How to get a CSV file for my data saved in browsers and other password managers?
Click here to get the detailed steps for how to get a CSV file from browsers and other password managers.
How to add DualSafe Password Manager extension to my browser?
DualSafe Password Manager extension helps you auto save, auto fill, and auto update your login data and payment info safely.
Please follow the steps below:
Launch DualSafe Password Manager> click More Tools> find Add extension to your browser> choose the browser you want and install with one click.
Presently it supports Chrome, Opera, Brave, Edge, and other Chromium-based browsers.
How to activate DualSafe Password Manager Premium after purchasing?
If you already have an account, you can just sign in your DualSafe Password Manager account again to activate the Premium.
If you don’t have an account before placing the order, you will receive an email from noreply@itopvpn.com with your email address as the account and a temporary password (check both of your inbox and spam folder for the email), then please sign in with the account and the temporary password. Please change the temporary password as soon as you signed in.
Why do I need to verify my email?
It can make sure that you sign up an account for DualSafe Password Manager with a valid email address and you will not miss any important notification from DualSafe Password Manager.
Please make sure to verify your email address as steps below:
Click your account icon at the top left corner and then the Verify This Email button. You will receive an email to verify if the email address is valid.
What is Dark Web Monitor?
Dark Web Monitor helps you check for leaked data (usernames, email addresses, phone numbers, etc. ), and notifies you the leakage in time. This service is provided by Have I Been Pwned, so you can get all leaked results even if the data is not added in DualSafe Password Manager.
What is Password Health?
Password Health ensures your password health by checking the vulnerable passwords such as weak, reused, or compromised ones, and notifying you to update them.
What is One-time Password in DualSafe Password Manager?
Many services support 2-step verification which requires a one-time password or other second step after you entered your password. It adds an extra layer of security to your account in case your password is stolen.
You can save the secret keys of the services with 2-step verification in DualSafe Password Manager. Then DualSafe Password Manager will auto fill the one-time password for you when you log into the services.
How to export the info I stored in DualSafe Password Manager?
Launch DualSafe Password Manager> click More Tools> Find Import and Export> click Export Data>enter your account password>select the file path you want> click Save.
How to uninstall DualSafe Password Manager?
Windows 10:
Open Start > Click Settings > Click Apps on the Settings menu > Select Programs & Features or Apps & features from the left panel > Find DualSafe Password Manager and click Uninstall > Follow the on-screen prompts.
Windows 8.1 & 8:
Open Start > Click Control Panel > Select Programs & features > Find DualSafe Password Manager and click Uninstall > Click the Yes button when prompted to uninstall the program > Follow the on-screen instructions to remove the product from your computer.
Windows 7:
Click Start on your taskbar and select Control Panel > Under Programs > Click on Uninstall a program > Select DualSafe Password Manager > Click Uninstall at the top of the program list > Follow the on-screen instructions to remove the program from your computer.
1. What is iTop PDF?
iTop PDF is a full-featured yet easy-to-use PDF tool, which helps view, edit, comment, convert, and protect your PDF documents. It is not only an ideal choice for you to create perfect PDF documents by editing content, adding text, images & many kinds of annotations, attaching links, manipulating pages, customizing your unique stamp or watermark, etc., but also a powerful converter to perform the conversion seamlessly between PDF and a wide range of file formats like Word, Image, Excel, PPT, Text, etc.
2.What are the differences between iTop PDF Free and VIP?
The picture below highlights the main differences between the two versions. 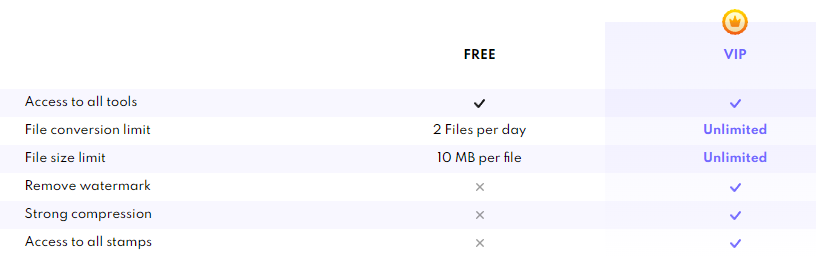
3.I haven\'t received my purchased product / license / activation code yet, what should I do?
1) You don\'t need a license or activation code to activate iTop PDF VIP account.
2) If you already have an account, you can just log in with your iTop PDF account again to activate the VIP.
3) If you don’t have an account before placing the order, you will receive an email from noreply@itopvpn.com with your email address as the account and a temporary password (check both of your inbox and spam folder for the email), then please log in with the account and the temporary password. It’s recommended to change the temporary password immediately after you log in.
Or click here to view the detailed instructions on how to activate VIP account.
4. Does iTop PDF account support multiple devices?
Yes. One iTop PDF account can be logged in on up to 3 devices at the same time.
5. What if I forgot the password of my iTop PDF account?
Please launch iTop PDF > click Log In at the top right corner > click Forgot password? > follow the on-screen prompts to reset your password. Or you can reset your password via https://it.itopvpn.com/reset-password
6. What file formats does iTop PDF support to convert?
iTop PDF enables you to convert PDF to/from Word, Image, Excel, PPT, Text, etc. in high quality. Common file formats are all supported: 'bmp'; 'dib'; 'jp2'; 'jpg'; 'jpeg'; 'jpe'; 'jfif'; 'gif'; 'tif'; 'tiff'; 'png'; 'doc'; 'docx'; 'xlsx'; 'pptx'; 'xml'; 'txt'; 'md'.
7. What factors can cause a converted file to be output with poor quality?
iTop PDF is capable of recognizing and converting all kinds of PDF files. The program can not only work perfectly with text-only PDF files but also work with image-based PDFs. The following factors may cause quality issues:
- It contains many complex elements such as pictures, graphs, etc.
- The original content in the PDF file is blurry.
- The text has the same background color as the PDF file.
To get better converting quality, it is suggested to choose the high-quality file to convert into other formats. Of course we’ll also keep working to improve the converting quality for your better experience.
8.Can I convert more than 1 PDF file at the same time?
Yes, in the iTop PDF Converter window, you can add more than 1 PDF file here and perform batch conversion. But Free version users can only convert 2 files per day. You can upgrade to VIP to get unlimited batch processing. Besides, you can Creat Shortcut on your desktop for quick access in future.
9.How to add attachments in PDF?
iTop PDF allows you to add attachments to PDF files in two methods:
1) After opening your PDF file with our program, click the Attachments panel on the left side, then click the Add Attachment icon to browse the file that you want to attach.
2) Add the attachment as a comment. Click the Comment tab > Attachment > click on the page where you want to add this comment > on the pop-up dialog, select a file to attach.
10.Why do I have the iTop PDF watermarks added in my PDF file? How to remove them?
For Free version users, after you use these three features (Edit Content, Add Text & Add Image) in our program and save the file, it will be added a default “iTop PDF” watermark. If you want to remove the default watermark, you need to upgrade to VIP first.
11.When I open PDF files, it will open with iTop PDF by default. How do I change this?
This is because iTop PDF has already been set as the default program for PDF files on your computer.
If you want to change it, please right-click one PDF file > click Open with > Choose another app > select the app you want to use. And remember to tick the option Always use this app to open .pdf files at the bottom. After the setting is done, when you double-click the PDF files on your computer, they will be opened with this default program.
12. What is PDF/A?
PDF/A is an ISO-standardized version of the Portable Document Format (PDF) specialized for use in archiving and long-term preservation of electronic documents. PDF/A differs from PDF by prohibiting features ill-suited to long-term archiving, such as font linking (as opposed to font embedding) and encryption. The ISO requirements for PDF/A file viewers include color management guidelines, support for embedded fonts, and a user interface for reading embedded annotations.
iTop PDF supports converting files to PDF/A files and there are many PDF/A types for your choice like PDF/A-1A, PDF/A-1B, PDF/A-2A, PDF/A-2B, PDF/A-2U, PDF/A-3A, PDF/A-3B, and PDF/A-3U.
13. How to change the interface language of iTop PDF?
iTop PDF supports more than 30 languages. Just open iTop PDF > click the Menu icon at the top left corner > click Settings > switch to your desired language > click the OK button to make it take effect.
14. If I uninstall iTop PDF, will the files created by this program be removed?
No, the created files are already saved on your computer, thus they won't be removed with the uninstall process. But if you deleted those files manually, they cannot be restored.
15. What should I do when the file cannot be opened?
- Check if your file needs to enter a password to open it. If so, just enter the correct password first.
- Check if your file is damaged. If so, please load the normal file.
- If not the above reasons, please contact us and provide us with your file for further checkk.
1.What is iTop Voicy?
iTop Voicy is a powerful all-in-one voice transformation and sound creation tool that unlocks endless possibilities of your voice. With advanced AI voice modeling and signal processing technology, it delivers instant voice changing with millisecond-level latency and crystal-clear audio quality. Besides, equipped with an extensive sound effects library and fine-tuning parameters, it enables you to create your unique voice according to your preference. Whether you're streaming, recording, or gaming, iTop Voicy gives you the creative freedom to achieve any voice exactly the way you want.
2.What are the system requirements for iTop Voicy?
• OS: 64-bit Windows 10 (build 17763) and above
• Memory: 4 GB RAM
• Storage: 5 GB available disk space
• 1280*800 screen resolution and above
3.Does my iTop Voicy account support multiple devices?
Currently, there is no device limit. Your iTop Voicy account can be used on as many devices as you want. Thanks to cloud sync technology, your custom voices and settings follow you across every device as long as you log into your iTop Voicy account.
4.What if I forgot the password of my iTop Voicy account?
Please launch iTop Voicy > click the User Profile icon at the bottom left corner > click Forgot password? > follow the on-screen prompts to reset your password. Or you can reset your password via https://it.itopvpn.com/reset-password
5.What audio/video formats does iTop Voicy support?
Audio formats supported: mp3, aac, ac3, flac, wma, wav, ogg
Video formats supported: mp4, avi, flv, mkv, mov, ts, 3gp, mpg, wmv, webm",
6.Why is there delay or stuttering in my voice changing effect?
Audio processing requires computational resources. Please try closing other CPU-intensive applications, or reducing the complexity of the voice effect.
7.How can I make the changed voice sound more realistic and natural?
You can try fine-tuning the parameters in Voice Lab. Instead of relying on a single sound effect, combine multiple effects subtly. Here’s some advice you can follow:
First, you can adjust the core voice settings (Volume/Pitch/Timbre) to get close to your desired base voice. Avoid extreme values.
Then, you can try the sound effects below:
3-EQ: To balance the low, mid, and high frequencies
Reverb - Room/Reverb - Recording Studio: To add spatial context
Chorus/Tremolo: To add organic variation, making the voice sound less robotic
High Pass: To cut out low-frequency rumble
Low Pass: To reduce harshness, creating a cleaner, more natural tone that fits better in a mix
Surround/Echo: To add a sense of space and depth, making it sound less flat
Tip: Less is often more. The goal is to enhance the voice, not overpower it. Make small adjustments and test frequently until you achieve a desired result.
8.How can I fix static or noise in my voice after applying the voice model or sound effect?
This is usually caused by microphone hardware or signal interference. Please try the methods below:
• Enable the "Noise Reduction" feature in iTop Voicy.
• Use a higher-quality microphone.
• Check if the microphone cable is securely connected.
9.Why can't others hear my voice after applying the voice model or sound effect?
You can check from the following two aspects:
• On iTop Voicy, ensure your desired voice model/sound effect is applied successfully.
• On the software you are using (e.g. Discord), set the input device to "iTop Microphone (iTop Virtual Audio Device)".
10.Can I use iTop Voicy to change voice in my existing audio/video files or recordings?
Of course, on the File Voice Changer panel of iTop Voicy, you can do it. It provides you with two modes: File Mode and Record Mode.
File Mode: Click the Import button to import your audio/video file, or drag a file onto the program interface directly > choose a desired voice model > you can also adjust the volume or turn on the Noise Reduction feature > click the Export button. Then you'll get a new voice file.
Record Mode: Click the microphone icon to record your voice, then follow the same instructions as File Mode mentioned.
11.What platforms or software does iTop Voicy support?
It supports a wide range of popular platforms, such as communication apps (Discord, Zoom, Microsoft Teams, Google Meet, TeamSpeak), games (Steam, Roblox, Fortnite), and streaming services (YouTube, TikTok, OBS, Twitch).
12.What should I do if iTop Voicy is not recognized as a microphone device in my game?
Please ensure that you already manually set the default microphone device to "iTop Microphone (iTop Virtual Audio Device)" in the audio settings of your game or communication software.
13.Is the software safe? Does it record or upload my conversations?
Absolutely safe. User privacy is a core value to us, and we hold it in paramount importance. iTop Voicy processes all audio locally on your device. We adhere to a strict privacy policy—none of your voice data leaves your computer. Just rest assured.
14.How to set up iTop Voicy on Discord?
1) Open Discord, and click the User Settings icon at the bottom.
2) On the left-hand panel, select "Voice & Video".
3) On the drop-down menu of Input Device, select "iTop Microphone (iTop Virtual Audio Device)".
4) Uncheck the option "Automatically determine input sensitivity" under Input Sensitivity, then speak into your microphone and adjust the sensitivity slider until the indicator stays primarily green while you are talking.
5) Click the ESC icon.
15.How to set up iTop Voicy on Zoom?
1) Open Zoom, click the user profile icon at the top right, and select Settings on the drop-down menu.
2) On the left-hand panel of the Settings window, select "Audio".
3) On the drop-down menu of Microphone, select \"iTop Microphone (iTop Virtual Audio Device)".
4) Uncheck the option "Automatically adjust microphone volume".
5) Click the Test microphone button, then speak into your microphone and adjust the microphone position relative to your mouth until the bar is in the middle while you are talking.
6) Close the Settings dialog.
16.How to set up iTop Voicy on Google Meet?
1) Open Google Meet, and click the Settings icon at the top right.
2) On the pop-up Settings window, select "Audio".
3) On the drop-down menu of Microphone, select "iTop Microphone (iTop Virtual Audio Device)".
17.How to set up iTop Voicy on Microsoft Teams?
1) Open Microsoft Teams, and click the three dots icon (Settings and more) at the top right.
2) Click the Settings icon.
3) On the left-hand panel of the Settings window, select "Devices".
4) On the drop-down menu of Microphone under Audio, select "iTop Microphone (iTop Virtual Audio Device)".
18.How to set up iTop Voicy on Roblox Voice Chat?
1) Make sure you open iTop Voicy first, then open Roblox.
2) Make sure the microphone and headphone devices set on iTop Voicy are working properly. Then open the voice chat box of Roblox to enjoy the voice changing experience.
19.How to set up iTop Voicy on Fortnite?
1) Open Fortnite, and click the Menu icon at the top left.
2) Select Settings > Audio > Voice Chat > Voice Chat Input Device > select "iTop Microphone (iTop Virtual Audio Device)" > Apply.
20.How to set up iTop Voicy on Twitch?
1) Open Twitch, click the user profile icon at the top right, and select Settings on the the drop-down menu.
2) On the pop-up Settings window, select "Audio/Video".
3) On the drop-down menu of Microphone, select "iTop Microphone (iTop Virtual Audio Device)".
4) Click the OK button.
21.How to set up iTop Voicy on Streamlabs?
1) Open Streamlabs, and click the Settings icon at the bottom left.
2) On the left-hand panel of the Settings window, select "Audio".
3) On the drop-down menu of Mic/Auxiliary Device, select "iTop Microphone (iTop Virtual Audio Device)".


